> ## Documentation Index
> Fetch the complete documentation index at: https://docs.cubic.dev/llms.txt
> Use this file to discover all available pages before exploring further.
# Local CLI review
> Run a fast local cubic AI code review from the command line before you push.
The **cubic CLI** reviews local changes before you push. It finds bugs and generates a prompt that your coding agent can use to fix them.
We recommend [connecting ChatGPT (Codex) or Claude Code](#bring-your-coding-subscription) for
access to more capable review models. You can also get started with cubic's included model.
Local reviews give you quick feedback while you work. Use GitHub PR review as the final pass:
it uses a different model and review pipeline for a more thorough review and may find issues
the CLI misses.
## Get started
### 1. Install the CLI
Install the cubic CLI for your operating system.
```bash theme={null}
curl -fsSL https://cubic.dev/install | bash
```
```powershell theme={null}
npx @cubic-dev-ai/cli install -g
```
### 2. Sign in
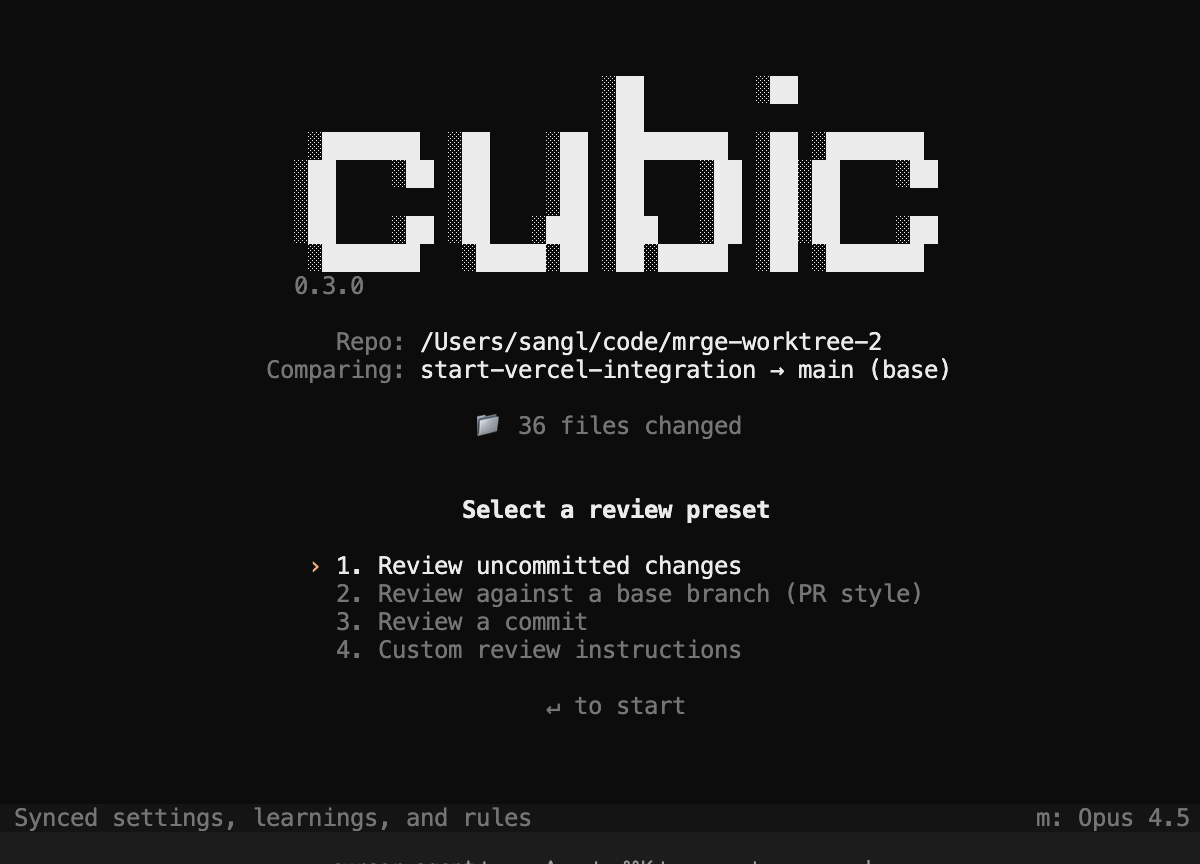
Open a terminal in your Git repository and run:
```bash theme={null}
cubic
```
The first launch opens your browser so you can sign in with your cubic.dev account. You can
also sign in explicitly with `cubic auth login`. If authentication fails, press `Ctrl+L` in the
CLI to log out and sign in again.
For CI and cloud agents, where no browser is available, use a personal API key instead. See
[Run in CI and cloud agents](#run-in-ci-and-cloud-agents).
 ### 3. Run your first review
From your repository, run this command in your terminal to review uncommitted changes:
```bash theme={null}
cubic review
```
To review your branch against its base instead, run:
```bash theme={null}
cubic review -b
```
The CLI detects the base branch automatically. To choose one explicitly, use
`cubic review --base main`, replacing `main` with your base branch.
### 4. Use the findings
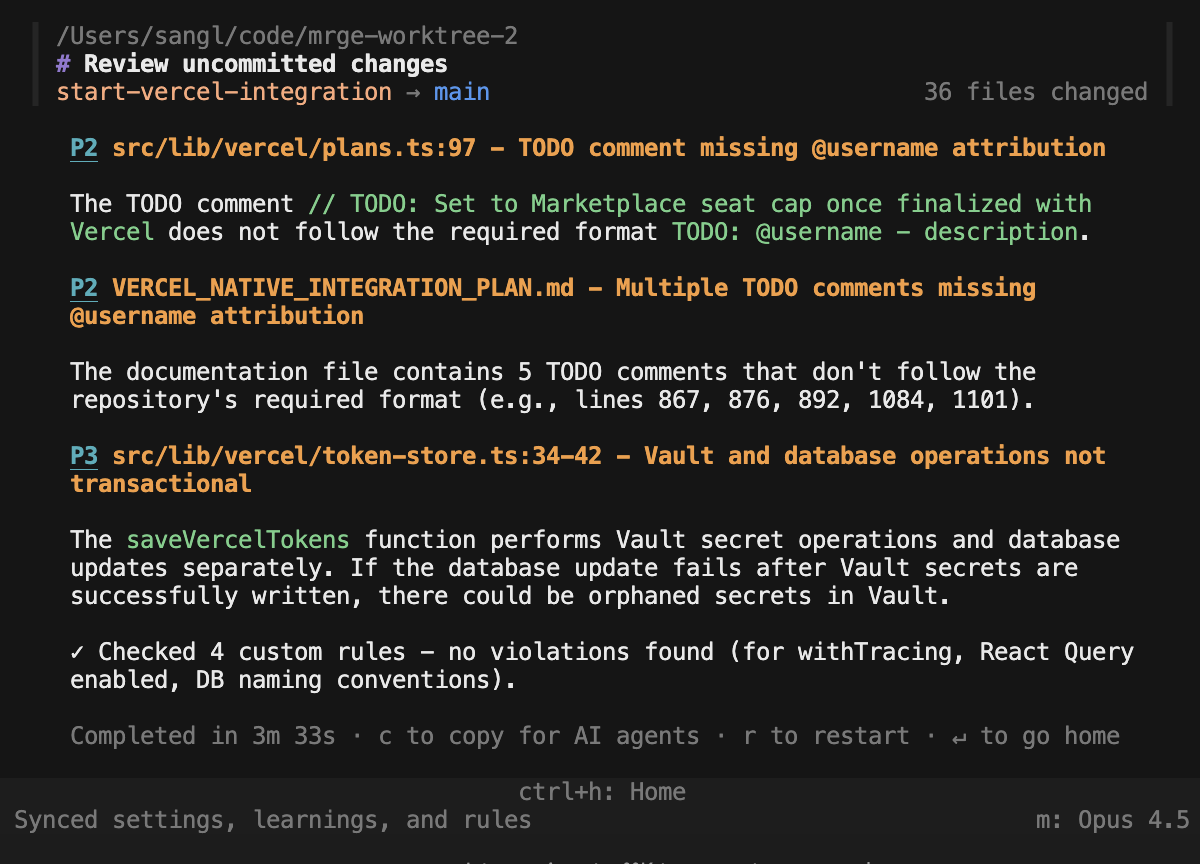
The CLI groups findings by priority. Fix the issues yourself or give the generated prompt to
your coding agent. Review the fixes, then run the review again to check them before you push.
After pushing, check cubic's GitHub review for additional findings.
### 3. Run your first review
From your repository, run this command in your terminal to review uncommitted changes:
```bash theme={null}
cubic review
```
To review your branch against its base instead, run:
```bash theme={null}
cubic review -b
```
The CLI detects the base branch automatically. To choose one explicitly, use
`cubic review --base main`, replacing `main` with your base branch.
### 4. Use the findings
The CLI groups findings by priority. Fix the issues yourself or give the generated prompt to
your coding agent. Review the fixes, then run the review again to check them before you push.
After pushing, check cubic's GitHub review for additional findings.
 CLI reviews use the same repository context as cubic's pull request reviews:
[custom agents](/ai-review/custom-agents), [learnings](/ai-review/memory-and-learning), and
repository settings. The CLI loads them for the repository in your `origin` remote, reading
`cubic.yaml` and linked instruction files from its default branch. Headless reviews (`--json`,
`--output-format`, and CI runs) load this context in cubic CLI v1.14 or later. To see what a
review loaded, check [its repository context](#check-what-a-review-used).
CLI reviews don't change the usage counts on the Learnings page, which count pull request reviews.
CLI usage appears in your [analytics dashboard](https://www.cubic.dev/analytics) as **CLI sessions**.
## Bring your coding subscription
Connect your existing **ChatGPT Plus/Pro** or **Claude Code** subscription to use its models
for local reviews. This is optional: cubic handles inference when you use the included model.
Connect your ChatGPT account to use Codex models with your existing plan:
```bash theme={null}
cubic auth connect codex
```
Sign in through the browser, then choose a Codex model in the CLI.
Connect your Claude Code account to use Claude models with your existing plan:
```bash theme={null}
cubic auth connect claude-code
```
Choose `opus` for the most thorough review, `sonnet` for everyday reviews, or `haiku` for speed.
cubic runs your local Claude Code as a subprocess and talks to it over the [Agent Client
Protocol (ACP)](https://github.com/agentclientprotocol/agent-client-protocol), the same pattern
[Zed](https://zed.dev/docs/ai/external-agents#claude-agent) uses for its Claude Agent. Your
Claude Code installation authenticates with Anthropic, makes every model call, and bills you
directly. cubic never sees, stores, or proxies your credentials, and does not call Claude's API,
use the Agent SDK, or offer Claude.ai login.
Reviews are interactive: you start each session and drive it from the UI. cubic does not run
autonomous loops in the background. This is the "ordinary use of Claude Code" that Anthropic's
[usage policy](https://code.claude.com/docs/en/legal-and-compliance) permits for Pro/Max
subscribers.
In the CLI, press `Ctrl+P` to choose a connected provider, then press `m` to choose a model.
You can switch without signing in again.
Run `cubic auth logout` to disconnect a provider. Disconnecting Claude Code from cubic does
not sign you out of Claude Code.
## Review with your coding agent
[Connect cubic to your IDE](/ide/agent-setup) and [install the skills](/ide/skills#install-skills),
then ask your coding agent to "review my code" to run a local review.
To include local review in your agent's workflow, add this to `AGENTS.md`, `CLAUDE.md`, or
`.cursorrules`:
```markdown theme={null}
## cubic review workflow
Before committing, run `cubic review` to review uncommitted changes.
Fix the validated issues and run the local review again.
Repeat until the local review is clean or only disputed issues remain.
After pushing, wait for cubic's GitHub review and check its comments.
Fix the validated issues and push the changes.
Use GitHub review as the final pass; it may find issues the local review misses.
```
## Command reference
Run `cubic review` without options to review uncommitted changes.
| Task | Command |
| - | - |
| Review uncommitted changes | `cubic review` |
| Compare with a base branch | `cubic review --base [branch]` (`-b`) |
| Review a specific commit | `cubic review --commit
CLI reviews use the same repository context as cubic's pull request reviews:
[custom agents](/ai-review/custom-agents), [learnings](/ai-review/memory-and-learning), and
repository settings. The CLI loads them for the repository in your `origin` remote, reading
`cubic.yaml` and linked instruction files from its default branch. Headless reviews (`--json`,
`--output-format`, and CI runs) load this context in cubic CLI v1.14 or later. To see what a
review loaded, check [its repository context](#check-what-a-review-used).
CLI reviews don't change the usage counts on the Learnings page, which count pull request reviews.
CLI usage appears in your [analytics dashboard](https://www.cubic.dev/analytics) as **CLI sessions**.
## Bring your coding subscription
Connect your existing **ChatGPT Plus/Pro** or **Claude Code** subscription to use its models
for local reviews. This is optional: cubic handles inference when you use the included model.
Connect your ChatGPT account to use Codex models with your existing plan:
```bash theme={null}
cubic auth connect codex
```
Sign in through the browser, then choose a Codex model in the CLI.
Connect your Claude Code account to use Claude models with your existing plan:
```bash theme={null}
cubic auth connect claude-code
```
Choose `opus` for the most thorough review, `sonnet` for everyday reviews, or `haiku` for speed.
cubic runs your local Claude Code as a subprocess and talks to it over the [Agent Client
Protocol (ACP)](https://github.com/agentclientprotocol/agent-client-protocol), the same pattern
[Zed](https://zed.dev/docs/ai/external-agents#claude-agent) uses for its Claude Agent. Your
Claude Code installation authenticates with Anthropic, makes every model call, and bills you
directly. cubic never sees, stores, or proxies your credentials, and does not call Claude's API,
use the Agent SDK, or offer Claude.ai login.
Reviews are interactive: you start each session and drive it from the UI. cubic does not run
autonomous loops in the background. This is the "ordinary use of Claude Code" that Anthropic's
[usage policy](https://code.claude.com/docs/en/legal-and-compliance) permits for Pro/Max
subscribers.
In the CLI, press `Ctrl+P` to choose a connected provider, then press `m` to choose a model.
You can switch without signing in again.
Run `cubic auth logout` to disconnect a provider. Disconnecting Claude Code from cubic does
not sign you out of Claude Code.
## Review with your coding agent
[Connect cubic to your IDE](/ide/agent-setup) and [install the skills](/ide/skills#install-skills),
then ask your coding agent to "review my code" to run a local review.
To include local review in your agent's workflow, add this to `AGENTS.md`, `CLAUDE.md`, or
`.cursorrules`:
```markdown theme={null}
## cubic review workflow
Before committing, run `cubic review` to review uncommitted changes.
Fix the validated issues and run the local review again.
Repeat until the local review is clean or only disputed issues remain.
After pushing, wait for cubic's GitHub review and check its comments.
Fix the validated issues and push the changes.
Use GitHub review as the final pass; it may find issues the local review misses.
```
## Command reference
Run `cubic review` without options to review uncommitted changes.
| Task | Command |
| - | - |
| Review uncommitted changes | `cubic review` |
| Compare with a base branch | `cubic review --base [branch]` (`-b`) |
| Review a specific commit | `cubic review --commit [` (`-c`) |
| Add custom instructions | `cubic review --prompt ""` (`-p`) |
| Return one JSON object | `cubic review --json` (`-j`) |
| Stream JSON events | `cubic review --output-format stream-json` |
Omit the branch from `--base` to detect it automatically. Combine `--base` with `--prompt` to add
instructions to a branch review, for example `cubic review --base main --prompt "Focus on the payment changes"`.
`--commit` can't be combined with `--base` or `--prompt`. Use `--output-format text`, `json`, or
`stream-json` to select an output format explicitly; `--json` is shorthand for `--output-format json`.
### Output formats
The default text output shows human-readable findings with colored priority labels.
Run `cubic review --json` when an integration needs one JSON object after the review finishes.
The object contains the `issues` array and a `repository_context` object that lists the custom
agents and learnings the review used.
Run `cubic review --output-format stream-json` when an agent, CI job, or integration needs progress
before the review finishes. The command writes compact NDJSON events to stdout, including finding
updates, retries, heartbeats, and a final `review.completed` or `review.failed` event. The
`review.started` event includes the review's `repository_context`.
## Run in CI and cloud agents
The CLI normally signs in through your browser. In CI and cloud agents there is no browser, so
authenticate with a personal API key instead. Requires cubic CLI v1.12 or later.
API keys are personal and grant the same access as your account, so each team member uses their
own key. Reviews require a seat on an active subscription.
Open [Settings > API, CLI & MCP > cubic CLI](https://www.cubic.dev/settings?tab=api-cli\&integration=cli)
and click **Generate API key**. Copy the key: it starts with `cbk_` and cubic shows the full
value only once.
If you already have a key, use the one you saved instead of regenerating it: the snippets on
the settings page show `cbk_...` in its place, so replace that with your saved key.
This is the same personal key the [MCP server](/ide/mcp-server#advanced-api-key), the
[Members API](/account/members-api) and the [Analytics API](/analytics/api) use. Regenerating
or revoking it replaces the key for your MCP clients, CI and API scripts at the same time.
Add the key to your CI or cloud environment as a secret named `CUBIC_API_KEY`. When the
variable is set, the CLI uses it and skips the browser sign-in.
```bash theme={null}
cubic review --base main --json
```
Use `--output-format stream-json` instead of `--json` when the job needs progress events
before the review finishes. `cubic review` exits with code 1 when it reports findings, so a
CI step fails on findings; append `|| true` to publish them without failing the job.
1. In the Cursor dashboard, open the **Secrets** tab for your cloud agent environment and add
`CUBIC_API_KEY`.
2. Install the CLI in the environment's install command in `.cursor/environment.json`:
```json theme={null}
{
"install": "curl -fsSL https://cubic.dev/install | CUBIC_INSTALL_DIR=/usr/local/bin bash"
}
```
3. The agent, or you over the VM shell, can then run `cubic review --json`.
1. In the cloud environment dialog, add `CUBIC_API_KEY=cbk_...` under **Environment variables**.
2. Set the setup script to install the CLI:
```bash theme={null}
CUBIC_DISABLE_GIT_AI=true npm i -g @cubic-dev-ai/cli
```
3. Set **Network access** to **Custom**, allow `www.cubic.dev`, `cubic.dev`, and
`mcafvrhahbqdwfrtncql.supabase.co`, and keep the default package-manager list ticked so `npm`
can install the CLI. If the environment does not ship ripgrep (`rg`), also allow `github.com`
and the GitHub release-asset hosts `release-assets.githubusercontent.com` and
`objects.githubusercontent.com`: the CLI downloads ripgrep from GitHub releases on its first
run, and the download redirects to one of those hosts.
Environment variables are visible to everyone who uses that environment. Because keys are
personal, keep the environment to yourself or have each teammate create their own.
Export the key in any headless shell, such as a container or a remote VM:
```bash theme={null}
export CUBIC_API_KEY=cbk_...
cubic review --json
```
In PowerShell:
```powershell theme={null}
$env:CUBIC_API_KEY = "cbk_..."
cubic review --json
```
Recommended environment variables for headless runs:
* `CUBIC_DISABLE_AUTOUPDATE=1` skips the npm registry version check and the binary download from
cubic's release storage.
* `CUBIC_DISABLE_LSP_DOWNLOAD=1` skips downloading language servers from GitHub.
* `CUBIC_DISABLE_GIT_AI=true` at install time skips the git-ai installer, which downloads from
GitHub releases and starts a background daemon on the runner.
### Check what a review used
Every headless review reports the repository context it loaded. Requires cubic CLI v1.14 or later.
With `--json`, read the `repository_context` field:
```bash theme={null}
cubic review --base main --json | jq .repository_context
```
```json theme={null}
{
"status": "loaded",
"repository": "acme/payments",
"settings": true,
"custom_agents": ["No console logging", "Risk engine checks"],
"learnings": 12
}
```
`custom_agents` lists the enabled custom agents the review loaded, and `learnings` counts the
learnings it loaded. `warnings` appears when cubic reports a configuration problem, such as a linked
instruction file that exceeds the 10,000 character limit. If the context could not be loaded,
`status` is `unavailable` and `reason` says why, for example when the repository is not connected
to cubic or the key's owner has no seat for it. The review still runs without the context.
In text output, the CLI prints the same summary to stderr before the review starts:
```text theme={null}
Using cubic context for acme/payments: repository settings, 2 custom agents, 12 learnings
```
### Revocation and limits
Revoke or regenerate the key from the same settings page. CI jobs that use a revoked key stop
immediately. API key traffic is rate limited per user: 300 requests per 15 minutes for session,
config, and settings calls, and 2,000 requests per 15 minutes for model calls. This comfortably
covers a few parallel CI jobs.
## Advanced settings
The CLI checks for a newer version in the background whenever you run a command. When an update is
available, the CLI installs it before running the command.
Run `cubic upgrade` to update immediately, or `cubic upgrade ` to install a specific
version.
Add `disable_auto_updates` to `~/.config/cubic/config.json` to receive update notifications without
installing them automatically:
```json theme={null}
{
"disable_auto_updates": true
}
```
Set `CUBIC_DISABLE_AUTOUPDATE=1` to skip both the update check and automatic installation:
```bash theme={null}
export CUBIC_DISABLE_AUTOUPDATE=1
```
This environment variable is useful in CI, on machines without outbound internet, or when you
need to pin a version.
The CLI installs [git-ai](https://usegitai.com) to tag AI-assisted commits with git notes. These
notes power the [AI coding analytics](/analytics/ai-coding) dashboard. Attribution tracking is
enabled by default, and git-ai shows an AI-versus-human authorship summary after each commit.
Set `CUBIC_DISABLE_GIT_AI` during installation to skip git-ai:
```bash theme={null}
curl -fsSL https://cubic.dev/install | env CUBIC_DISABLE_GIT_AI=true bash
```
```powershell theme={null}
$env:CUBIC_DISABLE_GIT_AI = "true"
npx @cubic-dev-ai/cli install -g
```
```cmd theme={null}
set CUBIC_DISABLE_GIT_AI=true
npx @cubic-dev-ai/cli install -g
```
Manage tracking after installation with `cubic stats`:
```bash theme={null}
cubic stats status
cubic stats disable
cubic stats enable
```
`cubic stats disable` removes git-ai hooks and preserves your preference during future upgrades.
`cubic stats enable` reinstalls git-ai and clears the opt-out preference.
## Limitations
CLI usage is unlimited during alpha, subject to rate limits that ensure fair access.
* API key requests are rate limited per user; see
[Revocation and limits](#revocation-and-limits). Spread larger CI fleets across team members'
own keys.
This documentation is built and hosted on [Mintlify](https://mintlify.com), a developer documentation platform.]